Chatops is a plugin for Nautobot that will give you the possibility to interact with your favourite Network Automation tools through multiple company chats. In this post I will take you through the progress of installing & configuring the plugin. for Slack
Nautobot documentation
https://docs.nautobot.com/projects/chatops/en/latest/

1. Setup a Chat Platform (slack)
For our post we will setup Slack, if you are looking for ways to configure other Chat Platforms, have a look here: https://docs.nautobot.com/projects/chatops/en/latest/admin/integrations/slurpit/
There are 2 ways to setup the communication between Nautobot & Slack, in this post we will go for the Socket approach.
1.1 Log in to https://api.slack.com/apps and select "Create New App". Select "From an app manifest."

1.2. Select your preferred Slack workspace for your app
1.3. In the window titled "Enter app manifest below," select the "JSON" formatting tab and copy/paste the contents of file bellow. Update the below settings, then click Next & Create.
  "display_information": {
    "name": "Nautobot Chatops"
  },
  "features": {
    "bot_user": {
      "display_name": "Nautobot",
      "always_online": true
    },
    "slash_commands": [
      {
        "command": "/nautobot",
        "description": "Nautobot",
        "should_escape": false
      },
      {
        "command": "/slurpit",
        "description": "Search over slurpit data",
        "should_escape": false
      }
    ]
  },
  "oauth_config": {
    "scopes": {
      "bot": [
        "app_mentions:read",
        "channels:read",
        "chat:write",
        "commands",
        "files:write",
        "groups:read",
        "im:read",
        "incoming-webhook",
        "mpim:read",
        "users:read",
        "users:read.email",
        "channels:join",
        "channels:write.topic"
      ]
    }
  },
  "settings": {
    "org_deploy_enabled": false,
    "socket_mode_enabled": true,
    "token_rotation_enabled": false
  }
We need now to collect a couple Secrets & Tokens which we will use later on in Nautobot. So grab a pen and paper, or notepad and write the following down.
1.4. SLACK_SIGNING_SECRET
On the General --> Basic Information page, note the Signing Secret near the bottom, under App Credentials. This will be needed later for setting SLACK_SIGNING_SECRET

1.5. Install the Slack App

Assign a channel and click on allow

1.6. SLACK_API_TOKEN
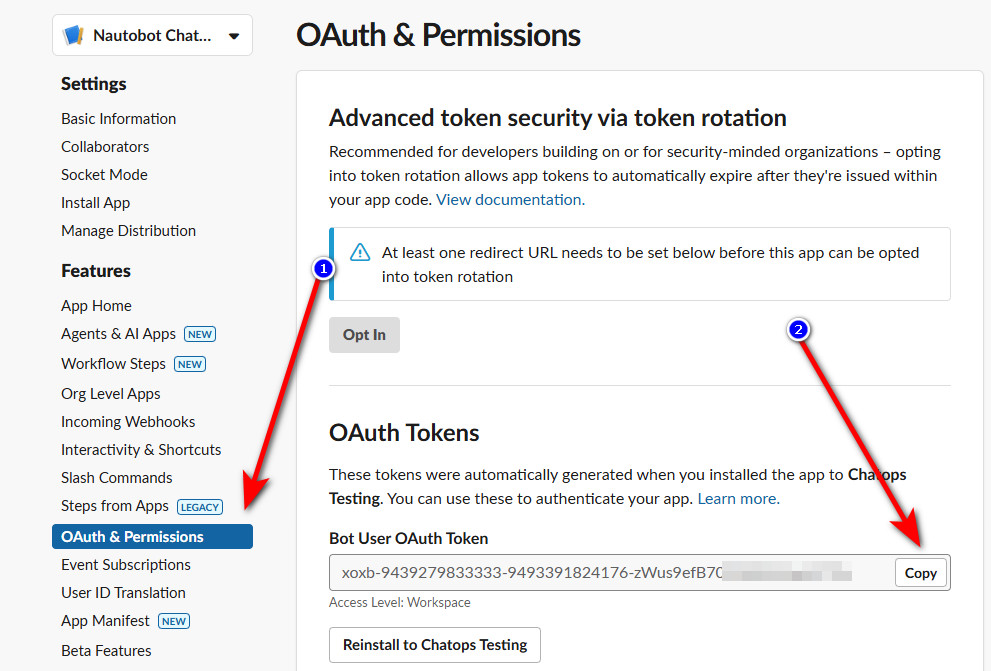
1.7. SLACK_APP_TOKEN
Under Settings --> Basic Information, scroll down to section "App-Level Tokens" and click Generate Token and Scopes to generate an API token.
Token Name: This can be anything you want.
Scopes: Click Add Scope and select the option connections:write.
Click Generate. Copy this API token. This will be needed later for setting SLACK_APP_TOKEN

2. Configure Nautobot for Chatops
Before continuing you will need the token(s) and secret you previously generated.
In your nautobot_config.py file, the following PLUGINS and PLUGINS_CONFIG variables will need to look simlar to this:
2.1. nautobot_config.py
PLUGINS = ["nautobot_chatops"]

PLUGINS_CONFIG = {
    "nautobot_chatops": {
        "enable_slurpit": True,
        "slurpit_host": "",
        "slurpit_token": "",
         "slurpit_verify": False,
        "enable_slack": True,
        "slack_api_token": "",
        "slack_app_token": "",
        "slack_signing_secret": "",
        "slack_slash_command_prefix": "/",
    }
}

2.2. Configure Access Grant
In Nautobot you have to configure access permissions per Slack command. I would recommend to first give all permissions just to verify and test the connectivity, then after you can fine-tune the permissions if needed.

2.3. Configure Account Links
When the permissions are set then there is 1 more security layer, you have to specify which accounts in the Slack Channel have access to the ChatOps plugin. Click on Add ChatOps Account Link, type the E-mail of the user and click on the button to get the User ID.

2.4. Start the Nautobot Socket Service
Official documentation on how to build a dedicated Socket Service can be found here:
https://docs.nautobot.com/projects/chatops/en/latest/admin/platforms/slack/#startup-slack-sockets-socket-mode
For our case we will start it on the terminal manually. Connect to the Nautobot server via SSH and run the following command on the terminal:
nautobot-server start_slack_socket